I saw this stinking adorable heart shape map in a frame the other day on StumbleUpon and I thought I just had to make a whole collage for myself! Well, I actually made this one for my lovebug on his birthday of all the places we have been together. it for I decided to do the whole thing in Photoshop. Sure, I could have found or printed different maps and cut them out into little hearts easily but I hope in the future to keep adding to the document and printing out bigger and bigger heart collages of all the places we visit together.
 |
| Found on Modern Parents, Messy Kids from Not On The High Street.com |
I have included a link to the PNG (Portable Network Graphic) file of this Hearts Overlay below. Feel free to use it for personal usage only. Once you download follow the steps listed here to make your own little places and pieces of your heart. This is a very step by step tutorial so don't let the length of it scare you. It is not very difficult, especially if you have experience using Photoshop.
You will need access to Adobe Photoshop CS4 or a program like it and an account to submit the finished piece for printing to an online print order service. I used Costco (Just $4 people!) but you can use Kinkos, Walgreens or wherever you would like. Where ever you can find someone that will make a 12x12inch printout for you (or larger, you can always trim it down).Afterwards, you can frame it or mount it onto something with a little bit of Mod Podge (Sidenote: I always call it Modge Podge? Does everyone else do that?)
I know this looks like a blank sheet of paper when you first download it but just TRUST me! Go ahead and go to the site to download the page FOR FREE by clicking here!
Look for maps online of the places you would like to use in your hearts. One thing you have to know about images on the internet is that they are formatted as 72 PPI (pixels per inch) for viewing on a computer.
I am going to show you how to take your images and make them 300 PPI so they will not be blurry when you print them. Your images will get larger like the example I have here so do not fret!
Once you have your image open it in Photoshop and do this:
NAV BAR > Image > Image Size > Resolution: 300
Once you have changed the resolution of the image you will see it get larger. You may even be too zoomed in to see it!
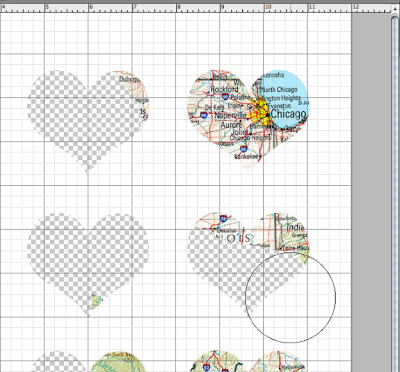
Open that same image as a new layer on your HEART OVERLAY.png document. Select all, then copy and go to your HEARTS document to paste it as a new layer, like this:
Control (or Command) A > Control C > Control P
Once you see the New Layer LABEL IT! I have mine labeled as Chicago.You will get your ten layers confused later if you don't. IMPORTANT! Drag your HEARTS OVERLAY layer to the top of your list of layers so the map will only peek through. This layer should stay on top at all times!
You can only manipulate a layer when it is selected. So click the Chicago layer and move it around until you like where it is centered in the heart you want it to print in.
Now you need to find your Eraser Tool. Use it to get rid of any part of the map you can see overlapping into another heart. This will stop the maps from overlapping later. Once all you can see is your first complete heart behind the white overlay you're done with heart one!
Now you need to repeat steps 2 thru 5 eight more times with different map images of your choosing. If you follow the instructions properly this is what you should have once you are finished. I chose to put a graphic heart in the center instead of a map, as you can see.
Once you are finished save your file as a JPEG (it came to you as a PNG so be sure to make this change!) and the document should be formatted at 300 PPI already since you are receiving the download from me. Place your order for printing and there you go! Instant cuteness and for just a couple of bucks! The red in my final print turned out a bit dark but once I reprint I will post a photo of the complete finished product!
Once again, feel free to use my document and this tutorial for personal usage only. Let me know if you like it and be sure to send me photos of your finished projects!
![]()


